Sunday, July 12, 2015

Yuca Fries


Can you believe we are almost half way through July?  Summer always seems to go so fast!  It has been a pretty mild summer in Nebraska and this weekend provided us with our first true taste of the humidity and scorching heat that we are accustomed to in the Midwest.
Trying not to sink the ship!

Our summer has been busy, busy!  I have been recovering from a knee arthroscopy for a torn meniscus and just finished teaching a summer course.  Jake has been busy taking care of the house (and me) as well as preparing to start a new job! After spending the Fourth of July at the lake, enjoying all of the things: food, drink, sun, family, and fun -  It is time to get back on track!  
Meal Prep for the week. Back on track!


A few weeks ago Jake and I ventured to a new Mexican restaurant in town that claimed to have a menu inspired by Mexican street food.   It was at this restaurant that we discovered Yuca Fries!  Yuca fries are created from the root of the Yucca plant. After tasting how similar they were to our long lost, carb loaded French fries, I could not wait to recreate these in my own kitchen. A trip to Whole Foods provided us with Yuca Root and I decided to try my luck recreating this Paleo friendly side dish! I have missed French fries since going Paleo and this twist on them puts my cravings at bay!  These are husband approved and requested for future side dishes!  
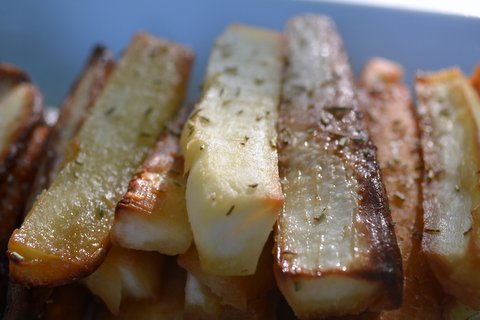
Yuca Fries with Salt and Rosemary


Ingredients
Yuca Root (peeled)
2 - 4 Tablespoons Olive Oil
Salt (to taste)

Process

  1. Start by peeling the Yuca Root.  I used a carrot peeler. 
  2.   Next cut the Yuca in half and then slice into quarters.  From here slice into fries (thickness to your liking). 
  3. Next coat with olive oil and salt. (Use more than you think you need - aids in crispness)
  4. Bake in the oven on 425 degrees for 20 – 30 minutes.


Variations

Play with seasonings.  I used salt and rosemary.  Garlic Salt or Salt and Vinegar could be good.  We also dipped these in Garlic Mustard Aioli and Paleo Ketchup – so many options!

Monday, March 2, 2015

Nutty Paleo Granola


Nutty Paleo Granola
So I have research to do and a dissertation to write and where do I find myself…in my sanctuary – my kitchen.  Some may call it avoidance behavior – I like to think of it as a study break!   

One of my favorite snacks and study foods when I was in college was a bowl of cereal!  After a few hours of hitting the books I would clamber down the stairs of Kappa Delta, recruiting some sisters along the way, and make my way to the kitchen.  We’d pull out the big bins of cereal, spending a few minutes eating it dry and chatting away before finally pouring a bowl and heading back to our respected study spaces!  It did not matter the time of day or how late in the evening or early in the morning  - these cereal breaks were always welcomed and there was always someone to join you!  I credit my sorority sisters and my love of cereal for helping me power through chapters of text and pages of papers!


Since going Paleo cereal has been absent from my diet!  When I started writing this week I have longed for a bowl cereal with a splash (yes a splash) of icy cold milk! As much as I tried my craving for this brain power food did not subside and I even found myself at the grocery store – in the cereal isle – looking longingly at a box of granola!  I didn't cave to grains instead I created my own Paleo friendly granola!  It is so easy peasy to make and so delicious!  I see a lot of study breaks in my future!  Enjoy!


 Nutty Paleo Granola

Ingredients
1 cup shelled pistachios
1/2 cup pepitas
1/2 cup sunflower seeds
1 cup cashew pieces
1 cup dried fruit (I used cherries)
1/4 cup honey (melted)
1 tablespoon coconut oil (melted)
1 tsp cinnamon
1 tsp vanilla (optional)
*You can adjust the amount of fruit and nuts - I made a fairly large batch to last the week!

Procedure
1.  Pre-heat the oven to 350 degrees.
2. Combine the nuts in a bowl.
3. Place half of the nut mixture in a blender or food processor and pulse 5 - 6 times.
4. In the microwave melt the coconut oil and honey. (seperately then combine)
5.  Add the cinnamon and vanilla to the melted ingredients.
6.  Place the rest of the nut mixture in the blender along with the remaining ingredients.
7.  Pulse a few times - You will need to stop and stir as the honey/coconut mixture stall the blender.
8.  Spread the mixture on a lined pan in an even layer.  
9.  Bake for 40 minutes stirring the mixture after 20 minutes.
10. Allow to cool and place in container. (I store mine in the fridge)
11. Serve with milk (almond or cashew if Paleo). 

Thursday, February 5, 2015

Venison Stronganoff

Jake Fall 2014
Meet my husband the deer whisper!  Jake and I have known each  other for 11 years and since the day I met him I was well aware of his love for nature and all things outdoorsy! From backyard bonfires and water skiing to running around the lake and camping, it is safe to say we like to be outside more than in. But one activity that is solely Jake’s thing is his passion for hunting! 

Jake is no casual hunter and at first I didn't understand his obsession for this sport.  Through the years I have grown to appreciate it. I have spent time accompanying Jake on his hunts and I am amazed at the amount patience and skill that it takes to be able to harvest wild game.  (I have very little of either!)
Quality time in a tree

For instance, did you know that many serious hunters do not just walk into the woods and wait for the deer to arrive.  Months before the season even opens, a hunter must apply for licenses and tags to hunt. Many serious hunters spend time scouring the forest scouting for signs of animal activity.  They thoughtfully consider where they will place tree stands or which timber to hunt. They analyze and agonize over pictures from trail cams.   These pictures tell a story - a hunter may discover that a doe that has been visiting their timber is the mother of three young fawns that depends on her for their development. This helps hunters to take care in selecting which animal they will harvest, often passing many others in the process. There is so much more that goes into it but you get the jest.
Homemade ground venison

I completely understand that eating wild game is not everyone’s forte.  I grew up eating venison. If not for having a father that also had an affection for the outdoors, I am not sure I would have acquired a taste for it.   I use the word acquired because if not properly cured or processed game meat can have a unique taste. Admittedly, I  almost prefer venison over beef. Plus, venison is very lean and packed with nutrients making it a healthy red meat option!

Homemade venison sausage & snack sticks 

Venison is not easy to come by and from September to January I often find myself a Hunter's Widow.  While Jake spends his weekends in a tree stand, I spend my time dreaming up what tasty meals I can create using wild game!  As much as Jake is out to get a trophy (he already has three hanging in the man cave) when it comes down to it, hunting for our family is not about the trophy.  We have become a unit that relies on Jake’s harvest to provide meat for us throughout the year. And now that we are "real adults" with a mortgage, saving money on groceries is welcomed! We've also learned how to process our own venison, not only saving us locker cost but also allowing us to control what goes into our food!  Here is my most recent recipe makeover!  One of our new favorites! Venison Stroganoff -  try it with beef stew meat if you are not a fan of wild game!
Venison Stroganoff over Zoodles

Paleo Venison Stroganoff

Ingredients
6 oz. venison stew meat
2 tsp. coconut oil
1/2 onion (chopped)
1 clove of garlic (chopped)
2 cups sliced mushrooms
8 oz. chicken broth
2 Tablespoons arrowroot powder (cornstarch if not Paleo)
1/2 cup full fat coconut cream (turn the can upside down for a few hours then drain off the liquid - it will look like sour cream)
2 zucchini (spiralized)

Directions
1. Sear venison in heated coconut oil.
2. Braise venison, onions, and garlic for 30 - 45minutes in 3/4 of the chicken broth.
3. Add mushrooms.  Continue to simmer until they are soft and a thick sauce begins to form.
4.  Turn off the stove.
5. In a bowl combine the coconut cream, arrowroot powder, and remaining broth. Add this to the  venison and mushroom mixture. (only add broth if needed otherwise your sauce will lose its consistency) 
6.  Serve over zucchini noodles.
7.  Enjoy!


Sunday, January 4, 2015

Swordfish Steaks with Tropical Salsa and Ginger Noodles

Swordfish Steaks with Tropical Salsa and Ginger Habenero Noodles
Happy New Year!  Did you have a great holiday?  Jake and I enjoyed sharing our holiday with both of our families and we even managed to pull off a surprise birthday party for my mom!  With the busyness of the holidays behind us, I am ready to settle in and see what 2015 has in store!  One thing I am reminded of every year is how blessed I am!  
Our Blessings!
Even now as the snow falls in Nebraska and the temperature continues to drop, I am blessed to have a warm place to call home!  Did I mention that it is 10° in Omaha and it feels like  -9°.  The highs this week will barely make it to the twenty degree mark! Yikes!  I knew that Old Man Winter would eventually peek his head in but I was really starting to enjoy the above normal temps! So much so that I have been dreaming about the tropics!  Ah to be in Costa Rica or Mexico eating fresh mangos again! 
I'll take the beach over snow!
 If I can’t be in the tropics then I will have to create it in my kitchen. That was my inspiration for this tasty dish! For those of you with New Years Resolutions to live a healthier lifestyle – this recipe will help keep you on track!  Plus it is packed with flavor!
Mango Pineapple Salsa
Another inspiration for this post was to introduce you to my newest kitchen gadget!  You can order one here!  This magnificent machine can help take your vegetables from blah to wah-lah! My first experiment was zucchini noodles. 


Paderno World Cuisine Spiral Vegetable Slicer
Since cutting out grains, I’ve been looking for alternate ways to create pasta dishes. Zucchini noodles are a great substitute for pasta and lets be honest -  there is only so much spaghetti squash a girl can eat! This gadget is easy peasy to use and clean!  
 
Beautiful Ribbons of Freshness
From here, you are free to create your dish!  I placed the noodles in a pan with a tablespoon on coconut oil and sautéed for 4 minutes! I decided to create a sauce by mixing ginger juice, coconut amino, raw honey, and habanero oil for a little heat.


These noodles would be great on their own, in a sauce, or served cold in a salad.  I used this as a complement to orange and lemon seasoned swordfish with homemade mango pineapple salsa.  You will be surprised when you taste how well these ingredients complimented each other!  This was another husband approved meal that was ready in 30 minutes!  Enjoy and let me know what you think!


Ingredients 
For the Zucchini Noodles
1 zucchini, spiralized
1½ Tablespoons Ginger Juice
1½ Tablespoons Coconut Amino (Soy Sauce will work for non-Paleo)
2 teaspoons Habanero Oil (can be replaced with sesame oil)

For the Mango Pineapple Salsa  

1 Mango (peeled and chopped)
1 Cup Pineapple (chopped)
½ avocado
¼ batch of cilantro
½ lime, juice
1 teaspoon raw honey (optional)

For the swordfish steak
2 swordfish fillets
1 tablespoon grated lemon peel
1 tablespoon grated orange peel
Salt & Pepper to taste

Process
1.  Preheat the oven to 350°.
2.  Create the salsa by chopping all of the ingredients, except the lime and placing in a bowl.
3.  Squeeze the lime over the chopped ingredients, stir in the honey if using (I omit it) and refrigerate until ready to serve. 
4. In a bowl combine the ginger juice, coconut amino, honey, and oil. Taste and adjust to your liking especially if using habenaro oil.  Stir and set aside.
5.  Season the swordfish and bake for 15 – 20 minutes in the oven or until fish easily flakes.
6. While the fish bakes, place coconut oil in pan and warm on medium heat.
7. Add spiralized noodles in a pan and sauté for 4 -5 minutes.
8.  Add the ginger mixture and sauté for 2 more minutes. Make sure the noodles are evenly coated.
9.  Transfer the noodles to a plate and pour any remaining sauce from the pan over the noodles.
10.  Place swordfish on the plate and top with salsa.
11. Enjoy!